
My Top 5 Tips for Carving Clay
Carving clay is a wonderful way to add texture and interest to your piece. But what's the best way to achieve a perfect finish? Here are my top tips for carving clay.
1. The State of Clay
This is by far the most important. Your piece needs to have dried to just the right level before you can carve into it. If the clay is too dry then your tool will just scratch into the surface and you'll risk cracking the piece by the pressure you'll need to apply to make a mark. If the clay is too wet however, you'll find that you won't be able to cut the clay away smoothly; it'll stick to the pot and your tool and you won't get a clean finish. You'll also likely warp the shape of your vessel as it won't be firm enough to hold it's shape. The way to find that sweet spot is to experiment. You'll soon get to the point where you know just by feeling the surface of the clay whether it's ready to carve or not. As a general rule, if it's still tacky or sticky, then it's too wet!

2. Provide an Anchor
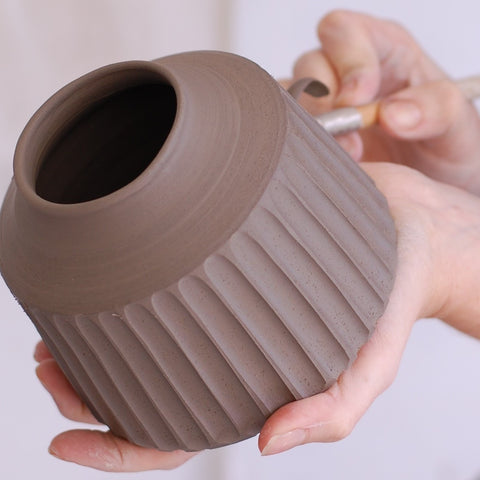
To get smooth, straight, even lines you need to be in control of the tool and the pot. As I draw my tool down the pot, I use my little finger as an anchor, stroking a line down the pot as I go. It helps me to keep the tool under control and prevents an slips or jerks.

3. Get Comfy
Before you begin to carve, make sure you're in a comfortable position. Carving into a vessel puts pressure on it so make sure you're supporting it as best you can. I tend to hold the pot in the palm of my left hand so any pressure put on the pot goes into the base where it's most robust. If you hold your pot by the wall, you run the risk of putting too much pressure on the weaker part of your vessel and then breaking it.
4. Don't be too precious
I have carved straight through the wall of countless pots. I've tried to carve pots that were too wet, too dry, with walls that weren't thick enough and everything else in between. The only way to perfect your technique is to practice, practice, practice and accept that a few are going to be destined for the reclaim bucket along the way!

5. Angle your Tool
In order to give your piece a beautifully textured surface, you don't need to gouge out huge amounts of clay. If you keep your tool at a relatively shallow angle to the pot, then you'll still get the effect without risking carving straight through the wall.

I hope these tips help with your next carving project!
For loads more tips and step-by-step projects take a look at my book, 'Carve Your Clay'.

Focusing on the pottery surface, Carve Your Clay covers a wide range of decorative carving from piercing, etching, inlaying to sgraffito, faceting, and fettling.
The techniques are taught through 16 projects, with clear, step-by-step photography and easy-to-follow instructions to achieve beautiful results. With easy guides on how to create form as well as glazing and firing, this is a comprehensive guide suitable for new and practicing potters alike.
Or you can find it on Amazon here
Many thanks – really helpful.
Thanks so much for sharing all your hard won processes! Much appreciated. Your work is elegant and beautiful!
Thank you for the tips. I’ve just started pottery and carving has really taken my interest.
I can see you mainly throw pots but I just wondered if you did classes on coil pots etc at all thank you Erica
I found this blog very informative, keep up the good work. Thanks for the opportunity. Commercial Kitchen Equipment, Repair Services, SEO Services UK.